As a professional website reception software, LiveReception has a good robot system.
Robot can help operator to answer visitor's questions, and to some extent robot can replace human operator for a while.
Now let's get down to make a robot working.
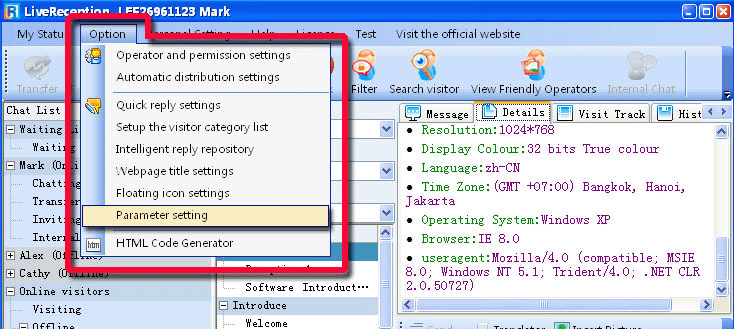
Option -- Parameter setting -- Robot
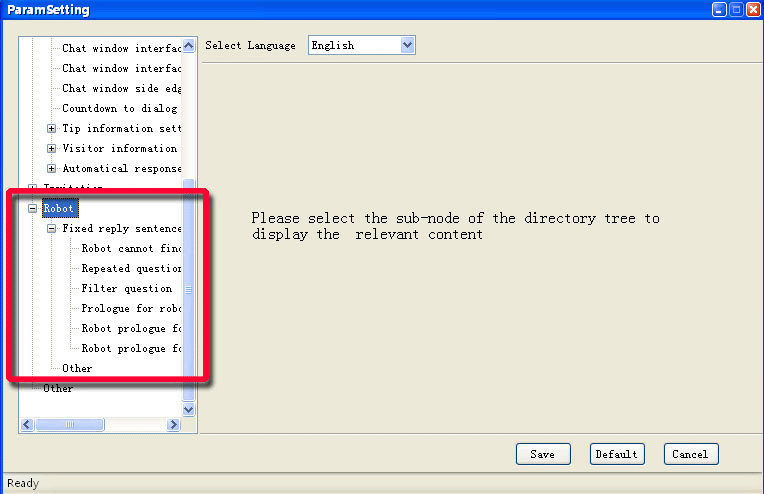
Now we set some robot automatic responses.
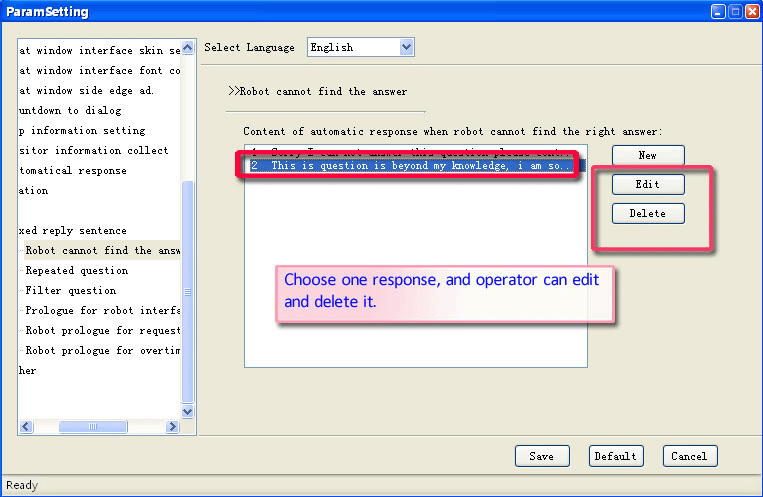
If robot cannot find answer
This setting is effective when robot is activated and it cannot find answer to the visitor's question.
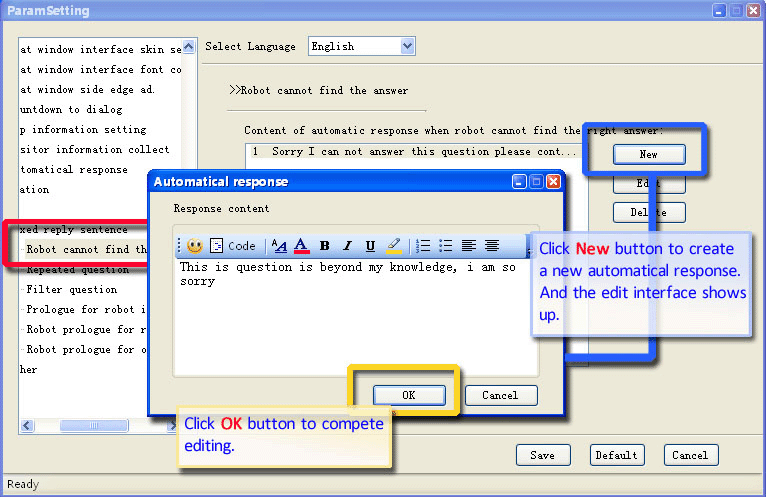
Robot -- +fixed reply senttence -- robot cannot find the answer
Click New button to create a new response.
Click Edit button to edit an existing response.
Click Delete button to delete an exsiting response.
If robot finds visitor inputting repeated questions.
This setting is effective when robot is activated and it finds visitor is inputting repeated questions.
Robot -- +fixed reply senttence -- Repeated question

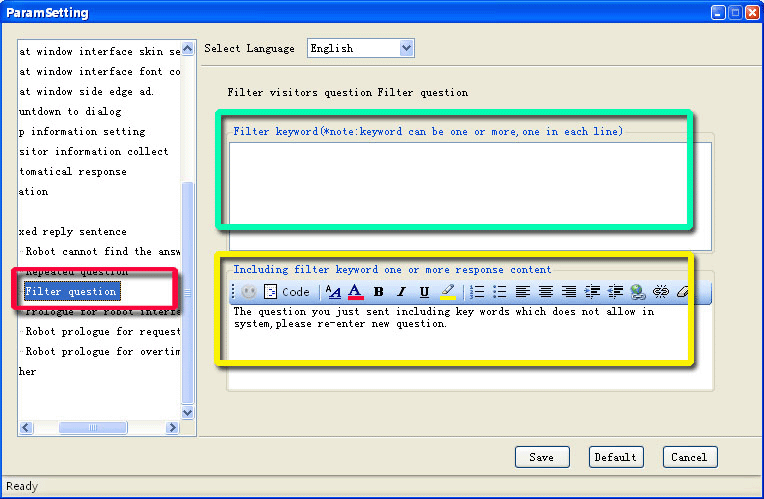
If robot needs to filter visitor's question
This setting is effective when robot is activated and it needs to filter visitor's question.
Robot -- +fixed reply senttence -- Filter question
Please input keywords in green box. If visitor's question matches the keywords, this question will be filtered.
And please edit a reply in the yellow box for filtering.
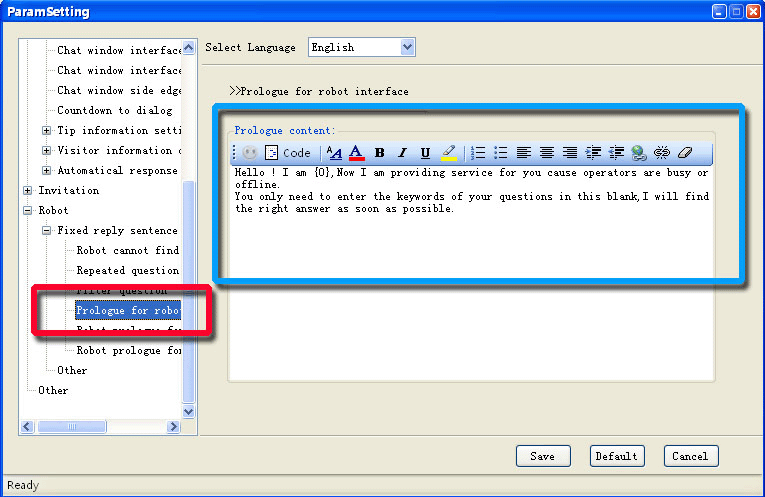
Robot prologue when it starts to chat with a visitor
This setting is effective when robot is activated and it starts to chat with a visitor
Robot -- +fixed reply senttence -- Prologue for robot interface.
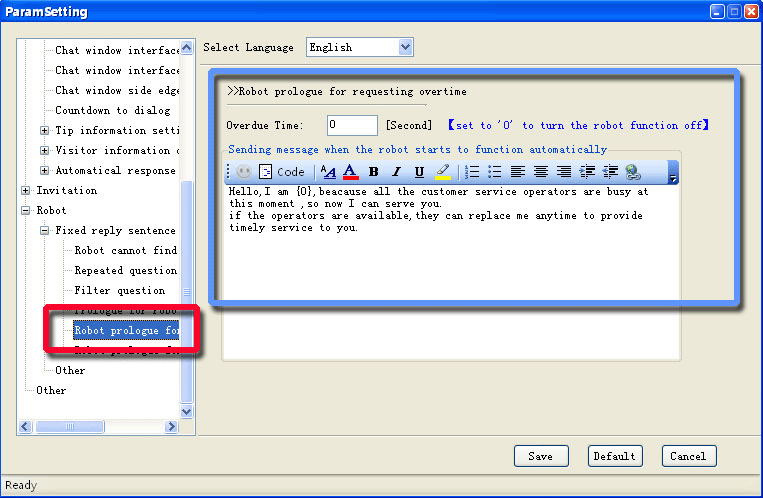
If visitor requests a chat and nobody answers
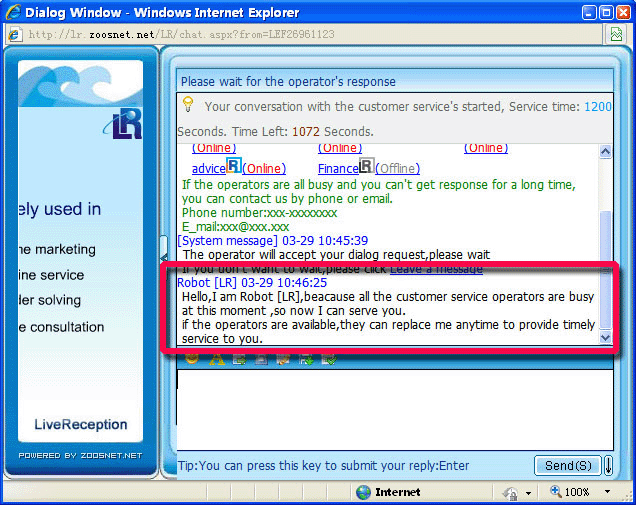
This setting is effective when robot is activated and visitor requests a chat, but no operator answers, after a certain time the robot will send a message to the visitor. Robot -- +fixed reply senttence -- Robot prologue for requesting overtime The overtime value is editable. |
From the visitor's view, we can see the robot message as follows,
If operator in a chat doesn't reply in time
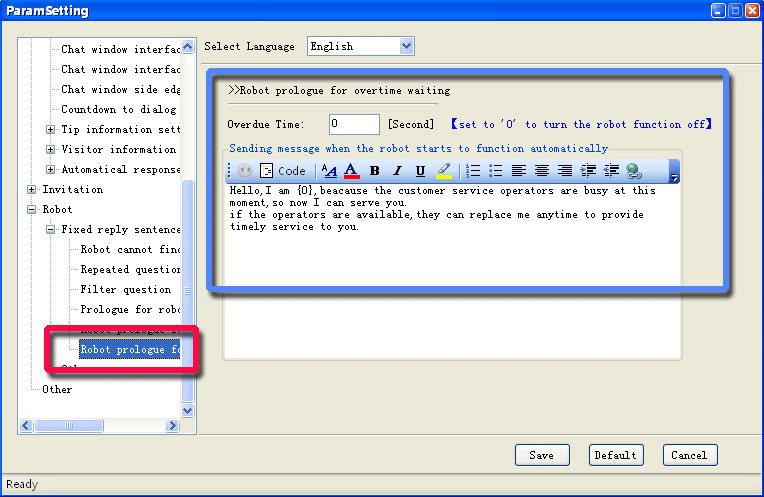
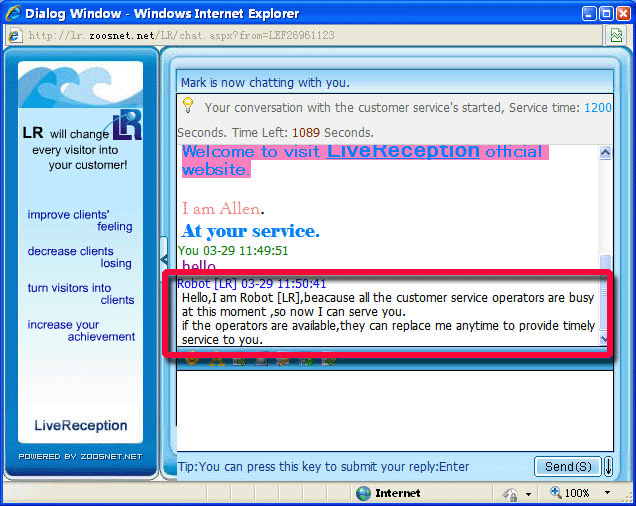
This setting is effective when robot is activated and visitor in a chat doesn't reply in time, after a certain time the robot will send a messge to visitor. Robot -- +fixed reply senttence -- Robot prologue for overtime waiting The overtime value is editable. |
From the visitor's view, we can see the robot message as follows
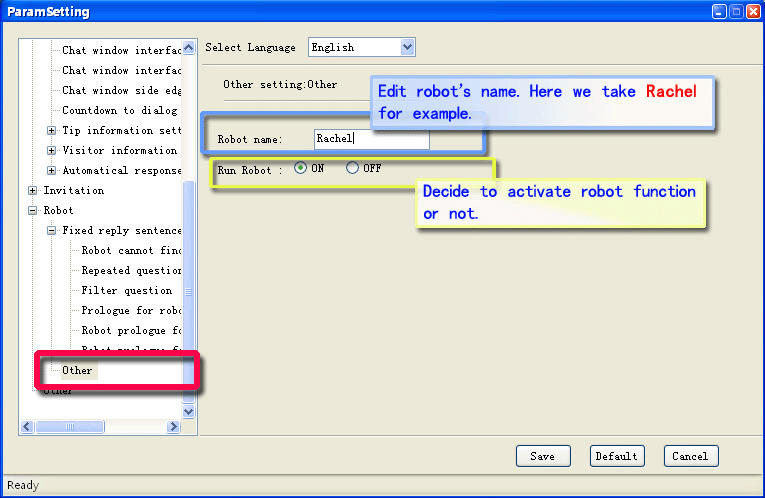
After the above settings, if operator wants robot working, robot must be turned on.
And operator can give robot a more friendly name.
Robot -- other
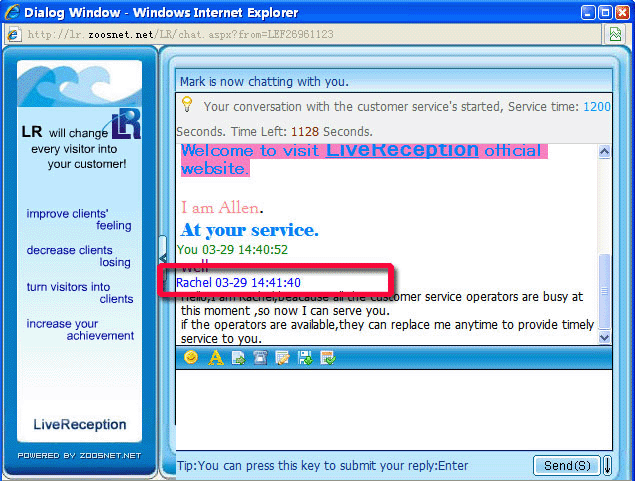
It is working. From the view of visitor, we can see the robot is named Rachel successfully.
Robot Reply Repository.
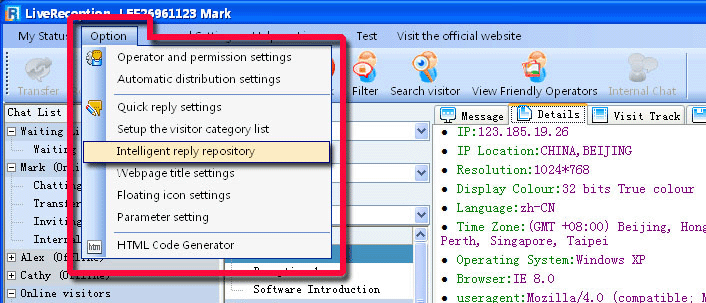
If the operator decides to make the robot working, a robot reply respository is necessary. It helps the robot to answer visitor's questions intelligently. Visitor asks a question, the robot will find a reply in the repository according to the keywords in visitor's questions. Now we let's establish a reply repository. Option -- Intelligent reply repository |
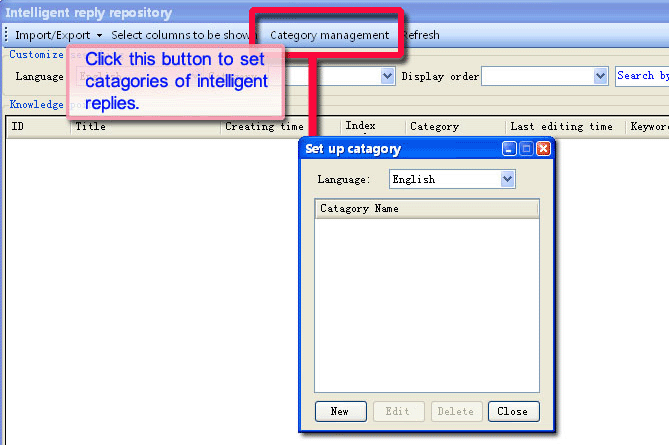
Click Catagory management button. There will be a interface Set up category.
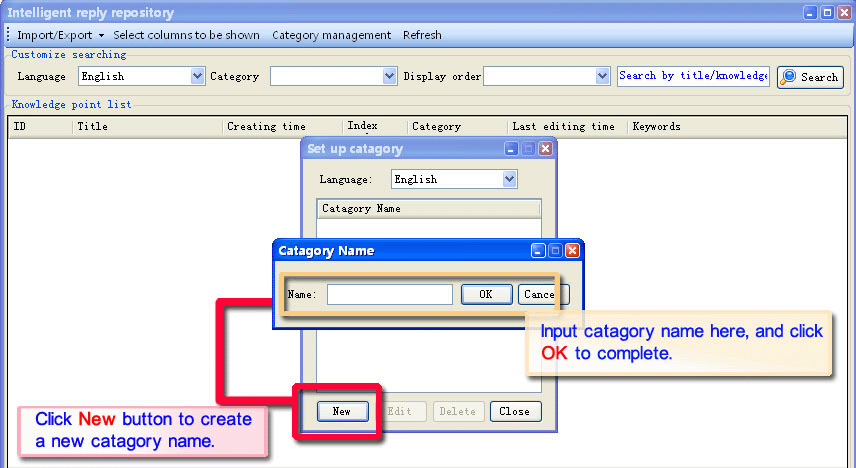
This step is to establish reply categories.
Click New button to create a new category.
Click Edit button to edit an existing category name.
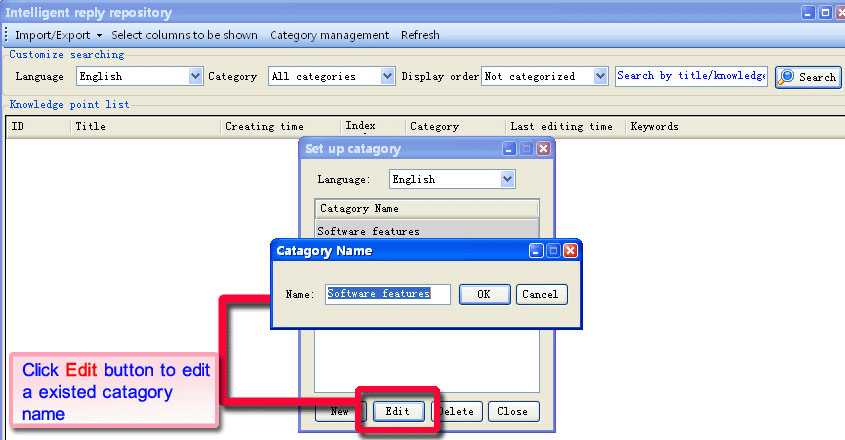
Click Delete button to delete an existing category name.
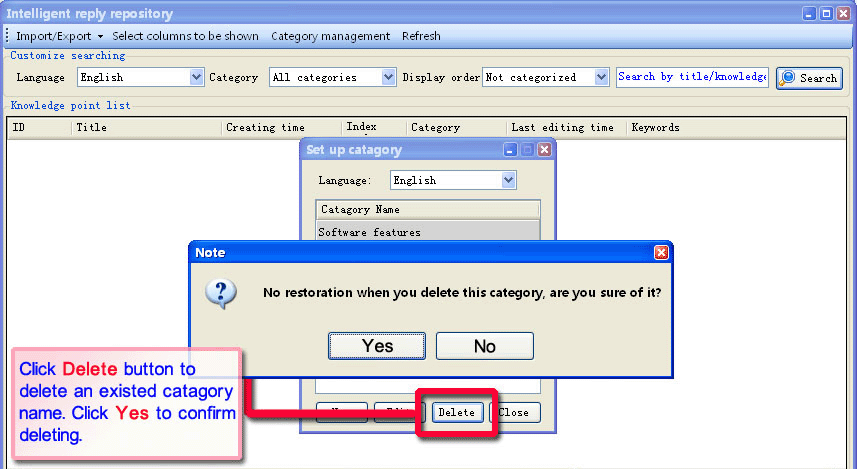
You can create several categories according to your business status.
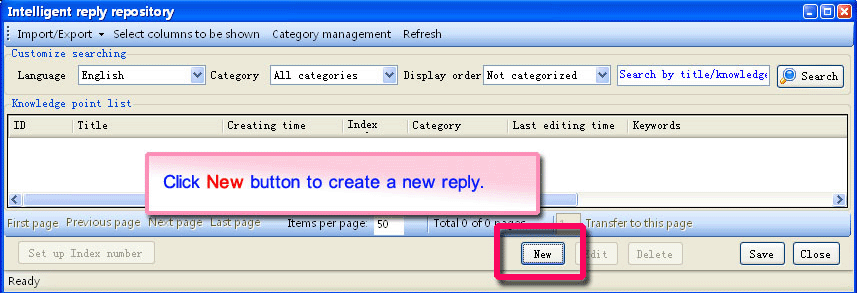
Click New button to create a new reply.
There will be a interface as follows. Now we edit a reply in this interface. In red box we can choose a category for this reply. In blue box we can name this reply. In green box we can edit a keywords repository. If visitor's question contains keywords in green box, robot will send the information in yellow box. Please seperate keywords with commas -- only commas, no space. In yellow box we can edit the content of the reply. |
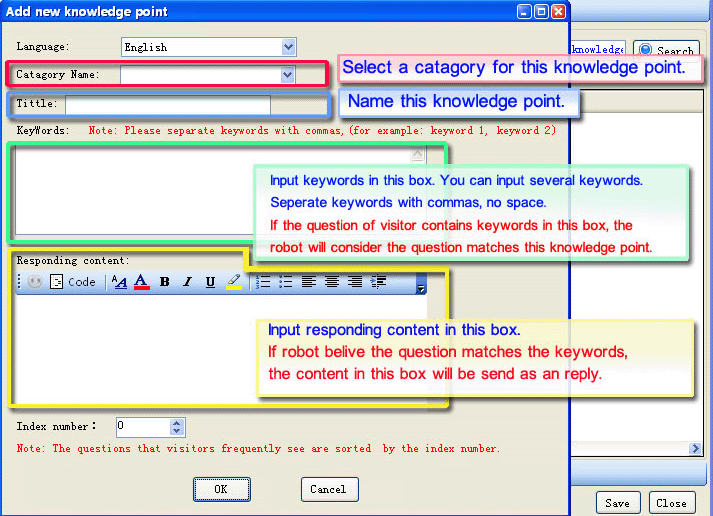
Now we edit this reply as follows, as an example.
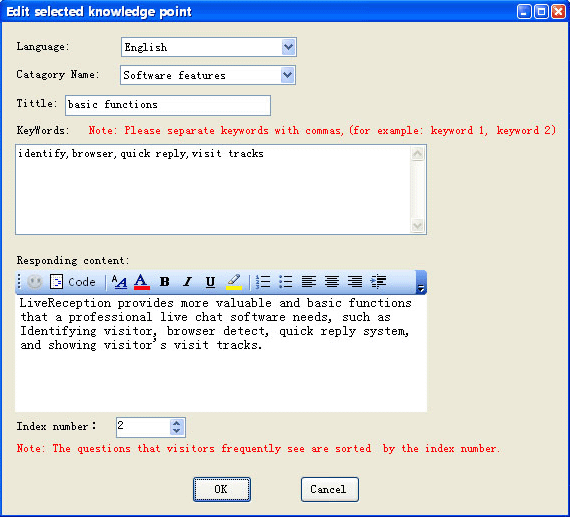
Click Edit button to edit an existing reply.
Click Delete button to delete an existing reply.
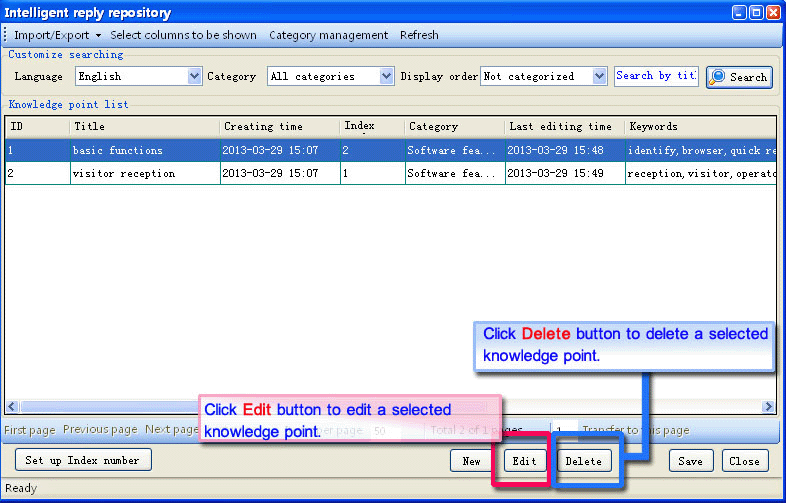
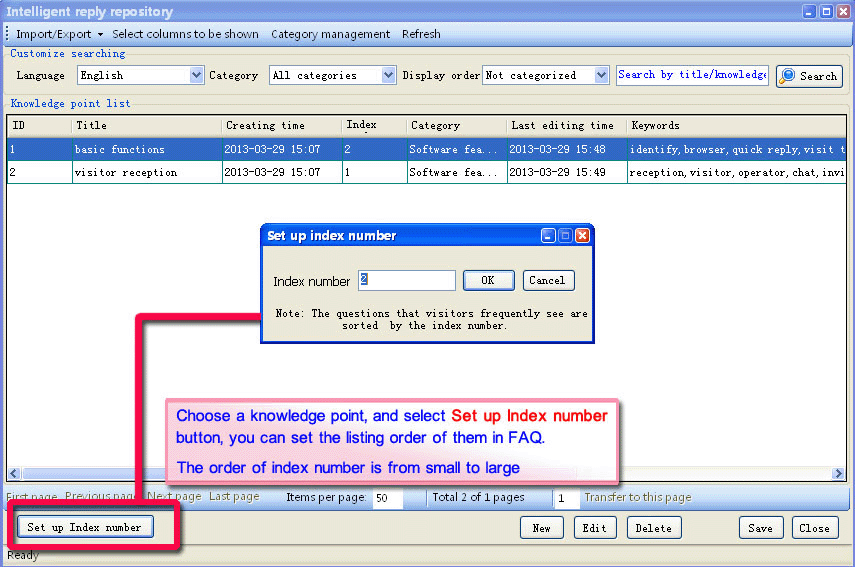
And we can set a index number for a reply. Index number decides the order of replies.
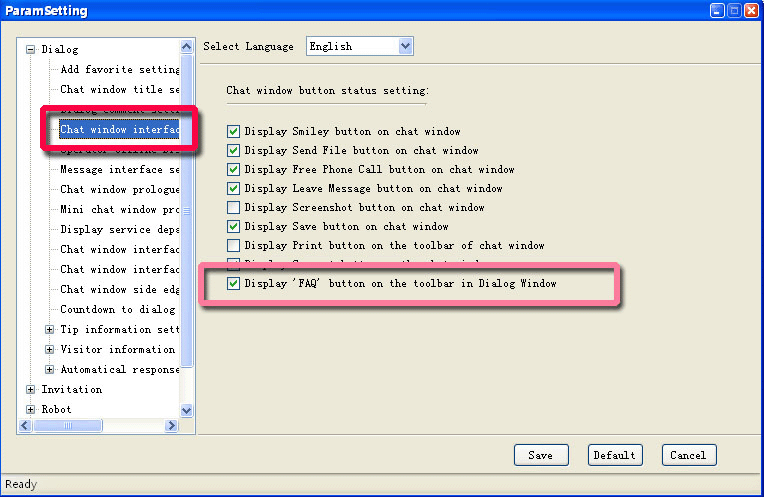
In the above image we have completed two replies. In fact, you may need a lot of replies. After completing intelligent reply repository, there is way to let visitor look up the whole repository to find points they concern. We can display a FAQ button in visitor's chat window. Visitor can click FAQ button to start a page, all intelligent reply points are listed in the page. Please make sure activating FAQ button. Option -- Parameter Setting -- Dialog -- Chat window interface button status. Check the option in red box in the image below. |
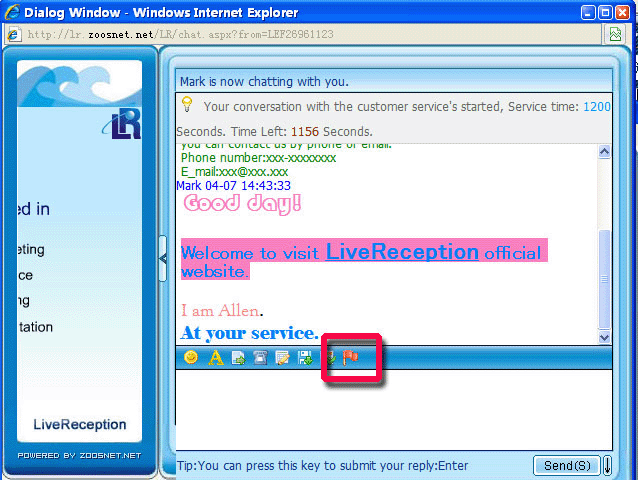
Now there is a button like a red flag in visitor's chat window. This is the FAQ button.
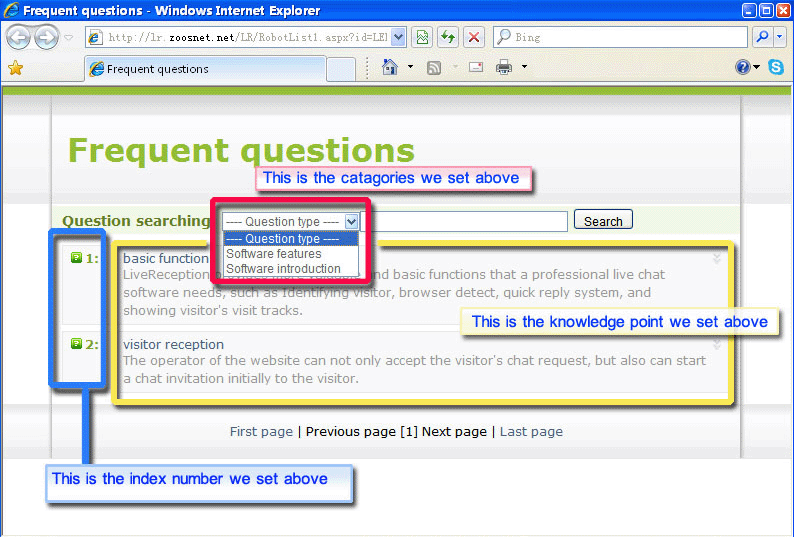
All replies and categories we set can be found in this page.
Robot reception work
After the above settings, our robot Rachel is ready to work.
The way to make Rachel work for us:
Select a chatting visitor, click Robot clerk shortcut button.
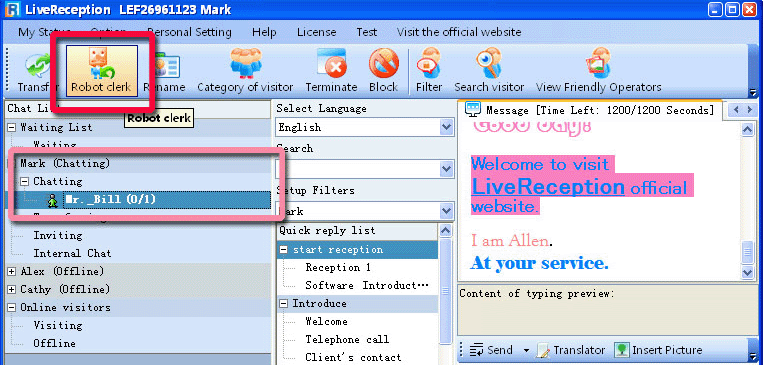
There will be a sign before the visitor's name (in red box), that's the sign of robot chatting.
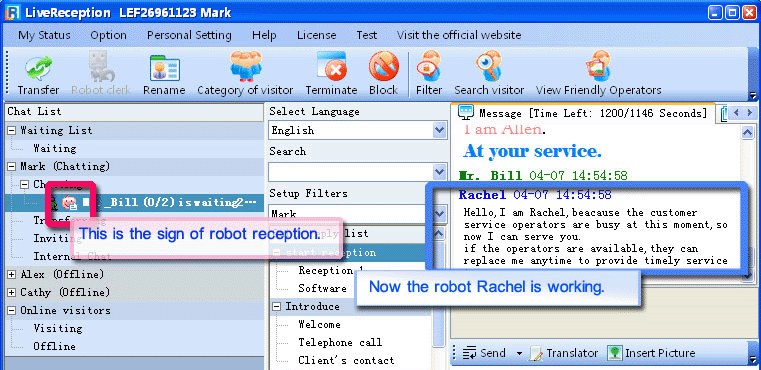
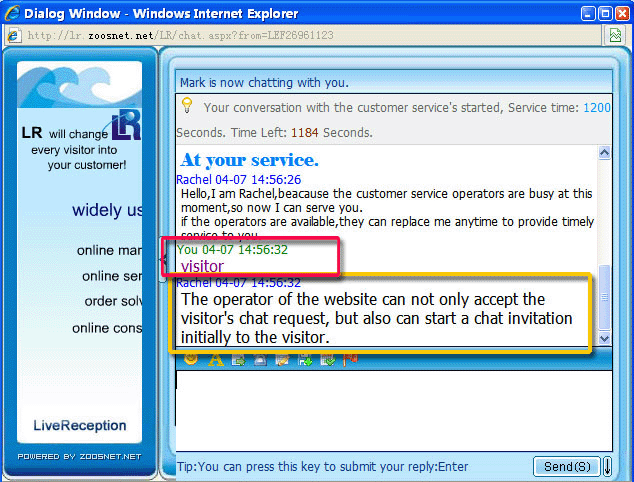
| As the image below, the visitor Mr. Bill has inpurt a word visitor (in red box) , which is included in the keywords of robot intelligent reply repository. So robot Rachel replies with corresponding reply (in yellow box). |
In the process of robot chatting, if the operator input something manually, the robot reception will end and switch to operator chat automatically. After completing above settings, sometimes operator is away from keyboard but LiveReception is online, the robot will do the reception job and talk to the visitor. Everytime the visitor request a chat and on one answers till for a certain time, the robot will serve the chat. How to set visitor request overime. |
Robot Chat History
Operator can check robot chat history and reports.
Click History shortcut button.
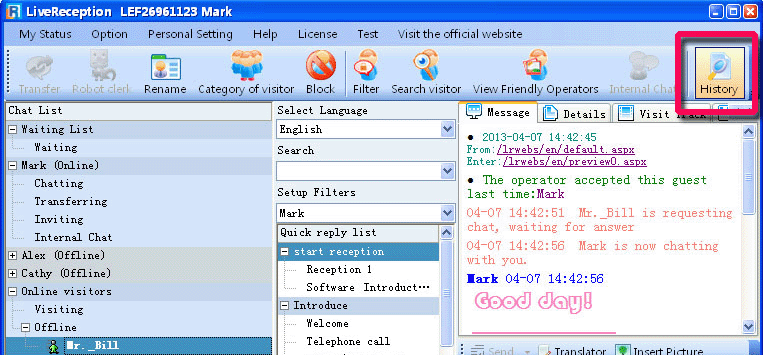
Then we enter history report interface.
Click Report button, there will be a pull-down menu. Choose Customize Report. (in red box)
As the image below.

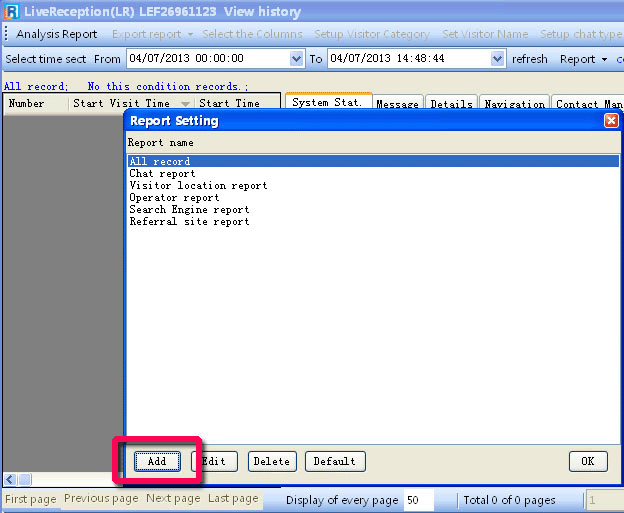
And customzie report interface shows up. There are 6 kinds of reports already exist.
Now we need to create a new report especially for robot chats.
Click Add button (in red box) to create it.
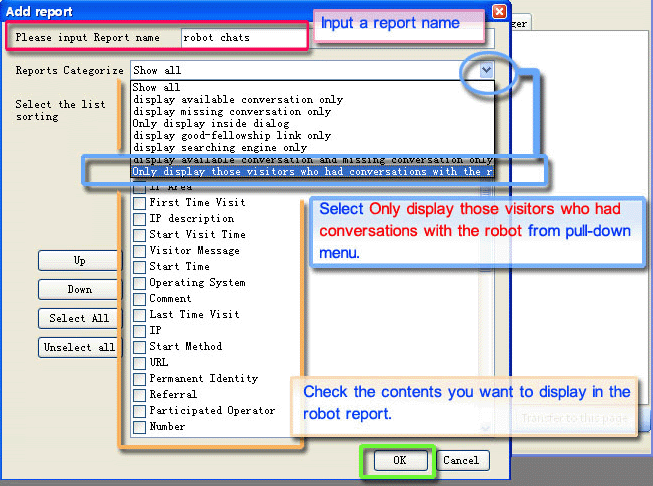
Now let's add a report. We need to name the report, here we name it robot chats for example. (in red box) Then we need to select its type. Click pull-down menu and choose Only display those visitors who had conversations with the robot. (in blue box) Click OK to complete this setting. |
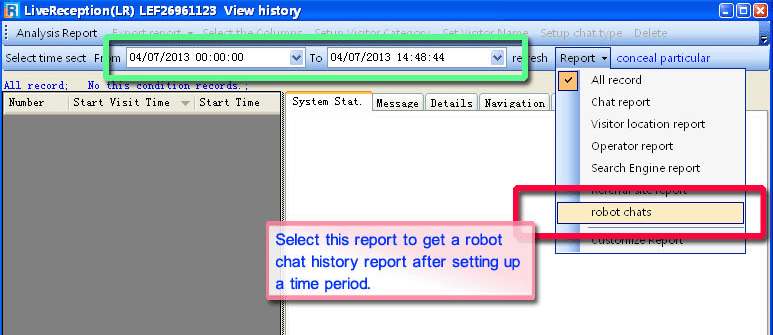
Return to History interface, operator can start to check the history data after setting the needed time period. (in green box) And click Report pull-down menu we will find the new report named robot chats. (in red box) The report will display. |
